24 Five-Minute Demonstration Speech Topics, with Timed Outlines

Good five-minute demonstration speech topics leave the audience able to do one small thing: fold a useful object, organize a messy task, or apply a simple technique. The challenge is choosing something you can show clearly while you explain it. A process that takes you thirty seconds in private can fill several minutes once you introduce the materials, turn them toward the room, and explain the awkward step.
The 24 ideas below use ordinary materials and a visible result. They are followed by three worked outlines, a five-minute timing plan, and a rehearsal method that includes your hands and equipment. Choose a process you already understand, then check the assignment rules before bringing props, food, water, or a device into the room.
Choose one result the back row can recognize
A demonstration speech teaches through a process the audience can observe. Explaining why organized notes matter is a different task from showing how to turn a page of notes into a usable summary. For this assignment, the second version gives you something concrete to perform and a result you can hold up.
Write your goal as “By the end, listeners will know how to…” and finish it with one action. “Use a camera” is too broad; “frame a simple portrait using three positions” has a manageable boundary. You do not need to prove that your method is the best possible method, only explain its purpose, show its steps, and acknowledge where another approach might suit someone better.
Use the finished-object test
Before committing, put the starting materials beside the finished result. Could someone tell what changed from several steps away? If the difference depends on tiny writing, a small phone screen, or a subtle color change, enlarge the example or choose something else. A close-up camera can help when the room has one, but it adds a technical dependency that needs its own rehearsal.
Count the transitions between actions
Uncapping pens, unfolding paper, finding a file, and moving one object out of the way all consume speaking time. A three-step process with complicated setup may be harder than a five-step process performed on one sheet of paper. Prefer a topic with three main actions, a simple workspace, and a clear place to pause after each action.
Six paper-and-pen demonstration topics
These are useful when you have a small budget or unreliable presentation equipment. Prepare enlarged samples for the explanation and normal-size materials for the actual demonstration. A sheet with bold lines is usually easier to follow than a finely decorated example.
| Topic | Bring | What to show |
|---|---|---|
| 1. Turn a paragraph into a three-part speaking card | A sample paragraph, marker, index card | Mark the main point, keep three prompts, and remove sentences you would otherwise read. |
| 2. Fold a corner bookmark | Two squares of paper and a book | Show the fold sequence, then place a completed bookmark on a page. |
| 3. Build a weekly priority board | Paper, sticky notes, marker | Separate fixed commitments, important work, and optional tasks without planning an entire lifestyle. |
| 4. Draw a simple process diagram | A large sheet and thick pens | Turn one everyday task into three labeled boxes and a decision point. |
| 5. Make a reusable packing checklist | A sample bag and a printed checklist | Group items by purpose, mark essentials, and check the bag against the list. |
| 6. Create a quick revision question card | A short textbook passage and cards | Replace a copied definition with a question, a prompt, and a checked answer. |
Six everyday organization topics
Organization topics work when the audience can see the problem at the start. Avoid presenting personal preferences as universal rules. Explain which situation your arrangement solves, such as finding a cable without untangling the whole bag, and show that particular improvement.
| Topic | Bring | Keep the scope this small |
|---|---|---|
| 7. Label and store three similar charging cables | Disconnected cables, reusable ties, labels | Identify, coil loosely, and label; do not demonstrate electrical repairs. |
| 8. Arrange a small presentation kit | A pouch, cards, pen, approved adapter | Show a consistent place for each item and a final equipment check. |
| 9. Fold a T-shirt for a drawer | A shirt and a flat surface | Compare the starting shape with one finished fold; skip a whole wardrobe system. |
| 10. Create a desk reset tray | A tray and six everyday desk objects | Sort what stays, what moves, and what belongs to a different task. |
| 11. Make a library-book return station | A bag, calendar card, sample books | Group borrowed items and attach a visible return reminder. |
| 12. Organize a small collection of printed handouts | Loose sheets, folder, dividers | Choose useful categories and demonstrate how a new sheet gets filed. |
Six creative and visual demonstration topics
A familiar creative task can become a good speech when you explain the decisions that a silent tutorial would hide. Tell listeners why you chose a darker line, a larger title, or a different angle. The point is a reproducible technique, rather than a performance of your own talent.
| Topic | Bring | Visible teaching moment |
|---|---|---|
| 13. Draw a simple object using three basic shapes | Large paper and marker | Build the outline before adding detail so beginners can follow the sequence. |
| 14. Improve a photo by changing the framing | A permitted camera and large sample images | Show three compositions of the same object without a long camera-settings lesson. |
| 15. Letter a readable event sign | Two sign samples and a thick marker | Choose the key words, establish size differences, and leave clear space. |
| 16. Turn a cluttered slide into one clear message | Printed before-and-after slides | Remove competing elements and explain the remaining visual focus. |
| 17. Build a paper storyboard for a short video | Six large cards | Arrange an opening, three actions, a result, and a closing shot. |
| 18. Wrap a small box using a reusable cloth | A cloth and an empty box | Show one suitable fold and knot, then demonstrate how the cloth opens again. |
Six study and communication topics
Use fictional names, invented appointments, and sample documents for communication demonstrations. Real messages and account screens can expose information you did not intend to share. Printed examples also give the audience a stable view while you speak.
| Topic | Bring | Audience takeaway |
|---|---|---|
| 19. Turn a vague meeting request into a clear message | A fictional message on large paper | Add the purpose, required response, and relevant time details. |
| 20. Mark a script for pauses and emphasis | A short sample script and colored pens | Mark thought groups, choose two important words, and read the difference aloud. |
| 21. Make a two-column comparison sheet | A sample decision and paper | Apply the same criteria to two options rather than write unrelated pros and cons. |
| 22. Name and sort a small set of project files | Printed fictional file cards | Choose a naming pattern and show where a revised file belongs. |
| 23. Build a three-minute rehearsal log | A timer and a prepared log sheet | Record a section time, identify one issue, and plan the next attempt. |
| 24. Explain a chart with one visual cue | A simple original chart and removable arrow | Orient the audience, identify the comparison, and point to the relevant pattern. |
A five-minute demonstration speech outline
This timing plan is a starting point, not an assessment rule. If your instructor counts setup or questions within the five minutes, include them in the rehearsal and reduce the demonstration accordingly. The full allocation below totals five minutes, including a small recovery allowance.
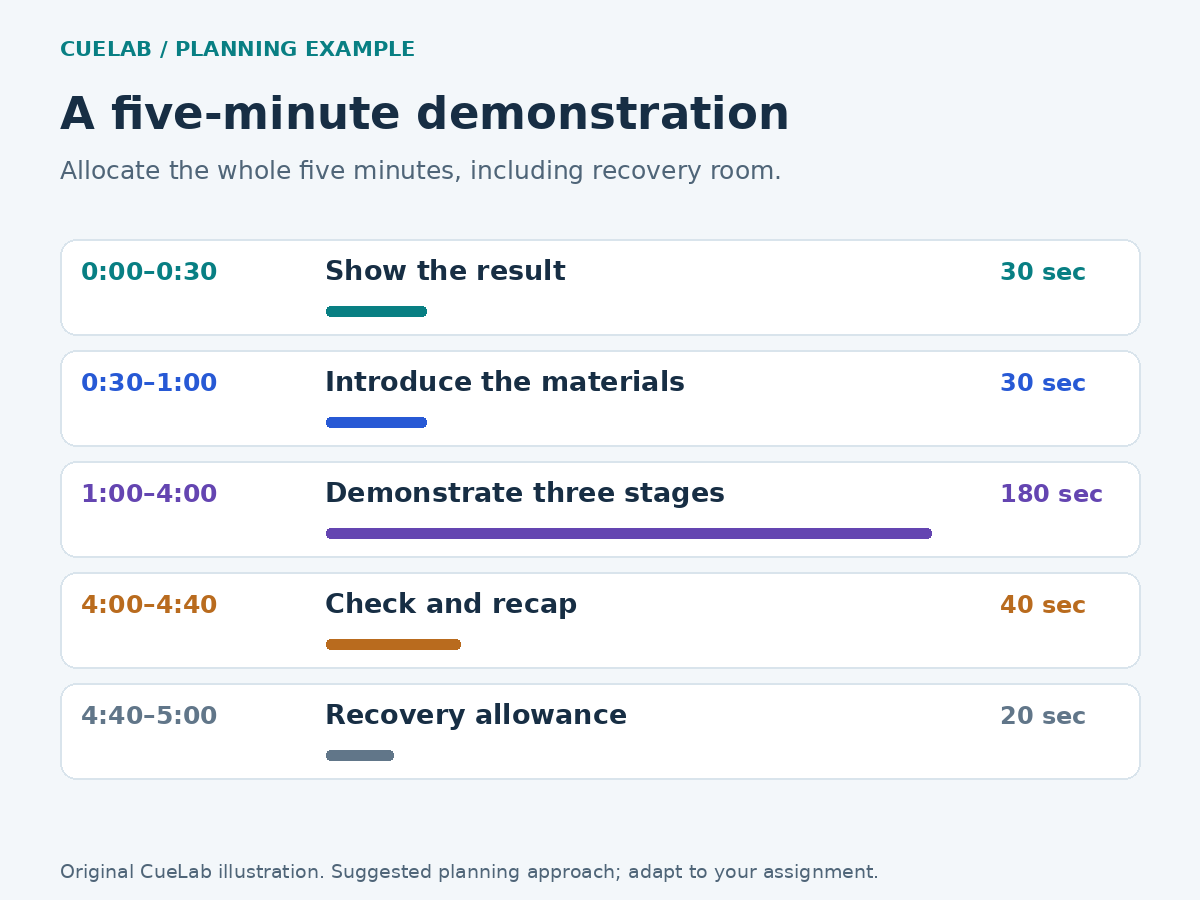
| Time | Purpose | What the audience sees |
|---|---|---|
| 0:00–0:30 | Show the result and say when it is useful. | A completed example beside the starting materials. |
| 0:30–1:00 | Introduce only the materials and terms needed. | A clear, uncluttered workspace. |
| 1:00–4:00 | Demonstrate three main stages. | One action at a time, with a visible checkpoint after each stage. |
| 4:00–4:40 | Check the result and recap the sequence. | The finished object or a completed example in use. |
| 4:40–5:00 | Allow for a slow action, reset, or closing pause. | A calm finish rather than an extra new step. |
Worked example: turn a paragraph into a speaking card
Open with a visible problem
Hold up a paragraph written in small type, then a card with three large prompts. An original opening could be: “These contain the same main message, but only one lets me find my next point at a glance.” Briefly show that your demonstration will turn a paragraph into a card; do not spend a minute criticizing people who use scripts.
Perform the three transformations
First underline the sentence that carries the main point. Next circle three ideas that support it, explaining why background detail is being left out. Finally write those ideas as prompts on the card, with enough space between them to find the next line quickly. Use a prepared duplicate if writing neatly takes longer than expected, while making clear which version you prepared earlier.
Check whether the card works
Deliver a short explanation from the prompts, then show the audience where you looked between points. The check is whether the card guides a spoken explanation, not whether it contains fewer words. Finish by telling listeners to try the method on one paragraph they already understand.
Worked example: make a readable event sign
Bring a deliberately crowded fictional sign and a blank sheet. Start by asking what someone walking past needs to know first: the event, its location, or a necessary action. Choose one situation, such as a classroom club meeting, so you can defend a particular order rather than claim every sign needs the same layout.
Use the three-minute demonstration section to select the essential wording, give the event name the largest type, and separate the remaining details. Place the crowded and revised versions side by side. Your final check is a reading task from the back of the room: can a listener locate the event and time? Do not claim that a particular font size works in every room.
Worked example: mark a script for pauses
Choose a short original paragraph with a comparison and a change of idea. Read it once without deliberate grouping, then show how a slash marks a useful pause and an underline marks a word you want to emphasize. Demonstrate the markings before giving the second reading, so the audience knows what to notice.
Reserve the final check for meaning: ask where the speaker changed from the problem to the suggestion. A successful demonstration makes that transition easier to hear. Avoid promising a fixed pause length or treating every hesitation as a mistake; people need different amounts of time to form and understand a thought.
Arrange the table for the audience’s view
Place unused materials to one side, the active work in the center, and completed examples on the other side. This arrangement reduces searching and makes the process easier to read visually. Stand so your body does not hide the critical step, then turn the result toward the room before continuing your explanation.
Describe actions in the order listeners can see them: identify the object, explain the action, perform it, then show the change. Talking through three future steps while your hands are still completing the first can leave the audience unsure which explanation matches which movement.
Prepare a backup that preserves the lesson
Bring a completed example and, where useful, one intermediate stage. If a paper fold goes wrong, show the prepared stage and explain where your live attempt differed. If a screen stops working, use printed images or file cards that demonstrate the same decisions. A backup should support the original lesson without pretending the live action succeeded.
For a short classroom speech, avoid processes that depend on flame, sharp tools, chemicals, allergens, physical restraint, or a biological reaction finishing on cue. Even an everyday activity needs permission when it involves food, liquids, or other people’s belongings. A simpler permitted topic is usually a better speaking choice than an elaborate demonstration with uncertain conditions.
Rehearse with the materials, then cut one thing
Time a complete run with the objects arranged as they will be on the day. Include taking things out, writing, moving prepared samples, and showing the result. A script-only reading cannot tell you how long the demonstration takes. If the run is too long, reduce a secondary explanation before speeding up the action the audience needs to understand.
Ask a practice listener to name the result and describe the three main stages. If they remember the props but not the process, make your checkpoints more explicit. Your next rehearsal should improve that specific problem, rather than add more facts to an already crowded five minutes.
Choose the topic you can demonstrate tomorrow
Pick two candidates, gather their materials, and try each critical step while explaining it aloud. Keep the one with the clearest visible result and the least fragile setup. Then write a short purpose statement, prepare the finished example, and rehearse the full sequence before expanding your notes.
For the next stage, use CueLab’s opening-to-closing structure guide to shape the explanation and the presentation backup plan to prepare for equipment trouble.
Reference: University of Florida IFAS: Speech Writing and Types of Speeches. The topic bank, worked examples, and suggested timings above are original CueLab planning examples.